
This activity follows on the Introducing forces using bowling balls and brooms activity. This activity challenges students to use the knowledge they gained during that activity in a physical/ experiential challenge.
Overview
Students will use a broom to push a bowling ball through two different courses. One is ‘out-and-back’ and the other is around a circle. Students compete with each other for the best time to complete the course.

Learning outcomes

First time column is the ‘lap time’ (time between clicks) and the second is the overall time (sometimes called “clock time”)
In this activity, students will be able to:
- Demonstrate their knowledge of the relationship between force and acceleration by minimizing the time required for them to push a bowling ball through a set course.
- Correctly use a phone stopwatch to collect total and lap times for a series of actions.
- Calculate:
- velocity using change in position and time.
- acceleration using change in velocity and time.
- force using mass and acceleration.
- Follow instructions for a physical activity.
Yeah, I know these don’t all fit the traditional SWBAT format, but I’m writing for other teachers, not administrators or education professors 🤣.
Materials
- Bowling ball (see previous post for information on how to get these at no cost).
- Broom
- Long space (hallway w/out classrooms next to it, gym, etc.)
- Space with a 3-6 m circle on it.
- Stopwatch with ability to record ‘lap’ times (most smartphones can do this).
- Worksheets:
Procedures
Preparation
Balls: One of the goals here is that when the ball is not in contact with the broom, its motion can be modeled as constant velocity. This is not actually true (due to the slight amount of air resistance and rolling resistance), but the heavier the ball the less impact these forces have on the ball’s speed. Because of this, pick the heaviest bowling ball you have for the challenge.
I have many different balls. If you are competing between students, you might ask them if they want a heavy ball or a light ball (but don’t let them get too light).

Location: Find the location for your courses. We completed the first activity in a gym, but couldn’t access it during our challenge phase, so we used a hallway that does not have classrooms off of it (yeah, the last thing a teacher needs is kids running up and down the hallway outside their room with a loud, rolling bowling ball!).
Course: Set up your course with tape as needed. You may be able to use come existing lines or circles, but you’ll likely need to tape some as well. Use painters tape (usually blue). Most other tape will leave gummy residue, resulting in your making enemies of your custodians—people you need on your friends list!
You will need to know the distances between your lines in the straight course, and the radius of your circle in the circle course.
Modification/accommodation: If you have students with limited body/arm strength, give them the lightest bowling ball you have. You might even provide a soccer ball or some other air-filled ball around the same size. Students in wheelchairs may have a difficult time with this activity, but if you think ahead you might come up with a solution (e.g. two brooms taped together to make a ‘scoop’ that could be attached to the student’s chair). Be creative and if you have a student who you feel may need accommodations, ask that student for ideas on the day before. I asked one student who was recovering from a foot injury if she would be able to just walk the ball along the course, and she appreciated that I wasn’t just assuming she couldn’t do it.
Handouts: Depending on the abilities of your students, you can provide them with complete ‘fill in the blank’ worksheets (I have one linked in the Materials section above). On the other end, you can just provide them with an outline of the challenges and let them create their own data collection system.
Scoresheet: If your students like seeing live results, get a big piece of butcher paper for the wall and write student names and their total time. You may also want to create an online version of this.

Teams or individual? Depending on the time you have, you can run this with partners or solo. I started with all my students having to do it, but realized this was taking too much time. Next year I’ll run it with partners, with each partner having to complete one of the challenges (while the other is the timer).
Something for students to do while others are completing the challenge. ‘Do as I say, don’t do as I do.’ This year I underestimated the time for this activity and had students hanging out most of the period while others ran the test (I think this was partly due to running it in a long hallway where students couldn’t observe others). If you have a large gym, many students will be comfortable sitting on the floor working on another activity while some are running the challenges.
Which challenge first? I did the out-and-back first, but found students had difficulty following all the steps. Next time I would do the circle challenge first, since students only have to record one time per challenge.
I’m writing the rest of this in the order with circle challenge first, then out-and-back.
Running the challenges
Make sure your students know how to collect ‘lap time’ data on their phones (or whatever device they are using). I’d do a trial run and have them all time as you call out ‘Start…first line…second line…turn zone…second line…first line…Finish” or something similar.
Circle challenge
The challenge here is to roll the ball around the circle in as little time as possible. The ball cannot go inside the circle, but may go as far out as a student lets it (the further out means a greater distance, so this is to the student’s disadvantage).
You may want to put a student ‘judge’ inside the circle who can call ‘foul’ if the ball goes inside the circle.
- One student sets the ball at the in the pit stop area. Another student calls our ‘3, 2, 1, go’ and starts their timer and the other student starts pushing the ball.
- Both walk/run down the circle..
- When circle is complete, record the total time for that student.
Repeat until all your students have completed their challenge.
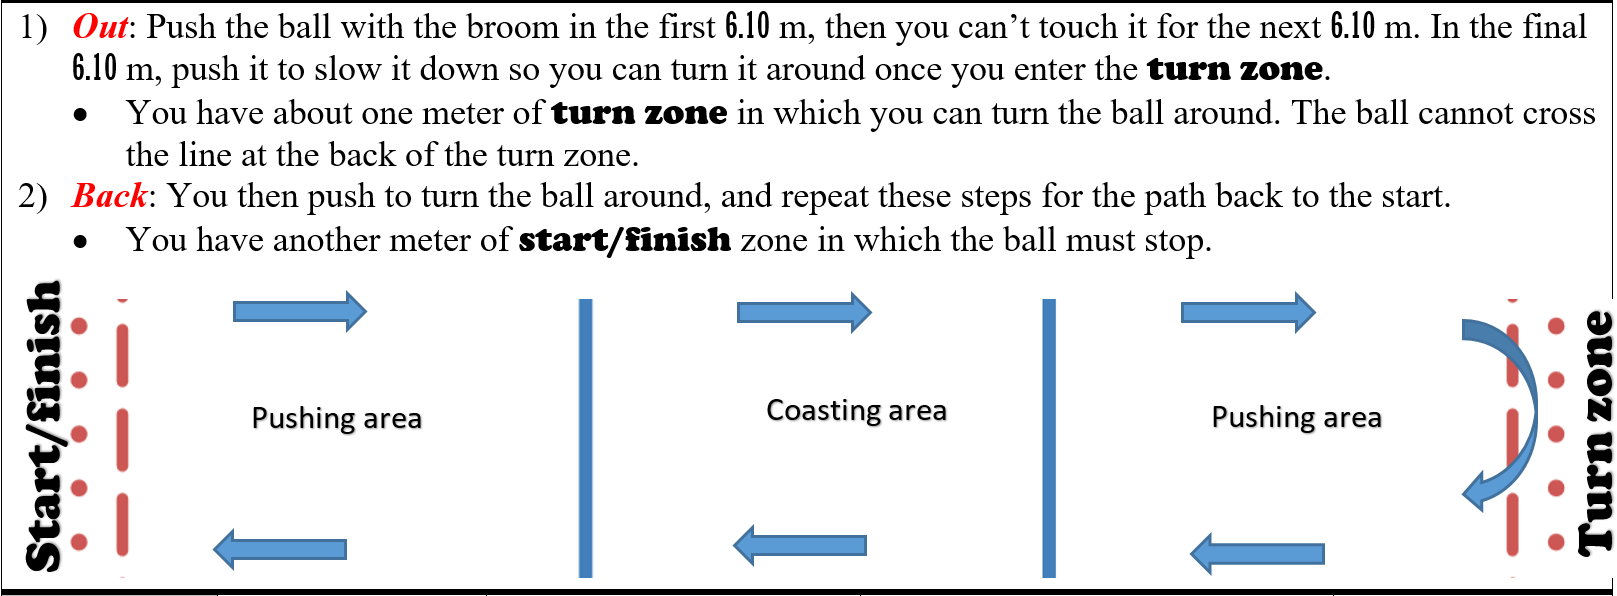
Out and back challenge
Make sure your timer understands that they are going to have to move with the ball person so they can record when the ball crosses each line.
Share the distances between the tapes with all students.
If you want to engage other students, set up a student at each line as the ‘judge’ for that line. They can call “foul” if the pusher violates any rules.
- One student sets the ball at the Start/finish line. Another student calls our ‘3, 2, 1, go’ and starts their timer and the other student starts pushing the ball.
- Both walk/run down the route. Encourage the timer to call out “lap” or something similar when s/he clicks their timer.
- When the course is finished, record the total time for that student.
Repeat until all your students have completed their challenge.
Analyzing the results
OK kids, play time is over. Time to start analyzing your data 😉.
Circular challenge
Solving for velocity is ‘easy’
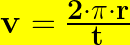
This is centripetal motion, so students will need to use
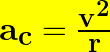
And finally

Out and back challenge
As described in the introduction to the out and back course, we will model the motion of the ball in the coasting section as constant velocity. Students can use their time data from this area to calculate the velocity of the ball. Again, this is where a light ball may have observable deceleration (yeah, I know, we hate that word, but I think it works here). Using the heaviest ball possible will help minimize this slowing down.
Once the know the velocity in the mid-section, they can solve for the acceleration in the ‘push’ sections using:

Using the assumption/approximation that v is zero whenever it crosses one of the lines at the ends.
And finally:
Desk work
As your students work on these calculations, check the following:
- Did they set a frame of reference so one direction is positive and other negative?
- Are they getting positive/negative results for v, a, and F that match their frame of reference?
- Are they using clock time or lap time for calculating their velocity and acceleration? They should be using lap time, since this is the time the ball spent in that section.
- Did they list zero as the net force in the coating area? (Again, this is a simplification we are using to develop this model.)
Extensions
Here are a few ideas you might use with your class. Feel free to add more in the comment section below.
- Graph position vs clock time. They won’t see enough data to observe acceleration, but they should be able to recognize that the average velocity during the ‘pushing’ sections is less than during the ‘coasting’ sections. They should also be able to identify positive and negative slope representing the direction the ball is moving in.
- Add competition for the lowest time through each of the six motion segments (push1, coast1, push2, push3, coast2, push4)
- Use a motion sensor to determine the exact acceleration of the ball during the ‘coasting’ section (try this once on your own first; your motion sensor may not be able to focus on the ball with people running next to it).
- Lay out a tape measure across the coast section and have other students video tape the ball as it goes through this so they can determine the acceleration of the ball.
- Assign each group a different ball, record the acceleration during the ‘coasting’ section, and determine how much of an impact the mass of the ball has on the ‘deceleration’ of the ball in this section.
- The list goes on and on…
Please leave any questions/suggestions/comments in the comment section at the bottom of the page.

Discover more from Lee Trampleasure
Subscribe to get the latest posts sent to your email.
These are great for my lower level physics class as well. We take several days and the students are very engaged. I would like to be on your email mailing list for more posts when you make them. Thank you.